checksum tricks and tips
hints, secrets, behaviours, assumptions and more..
Get the most from your hashing!
checksum represents a whole new way of working with hashes. This page aims to help you get the most out of the experience, wherever you're at..
![]()
- Absolute beginners
- Basic checksum tasks
- Launch modifiers
- Batch Processing
- Automatic Music playlists
- Custom Explorer commands
- Creating "quiet" checksums
- Cross-platform hashing
- In your SendTo menu
- Compare two Folders or Disks
- Compare two CDs
- Compare a disk with the original .iso
- Installer Watch (& upgrade helper)
- Command-line switches
- Preferences
- How do I..
Absolute beginners..
The basics: checksum creates "hash files". A hash file is a simple, plain text file containing one or more file hashes, aka. "checksums". Hashes are small strings which uniquely represent the data that was hashed. e.g..
cf88430390b98416d1fb415baa494dce *08. Allow Your Mind To Wander.mp3
(Mike Mainieri - Journey Thru An Electric Tube [1968] - I have the vinyl)
If you want to know more about the algorithms that checksum uses to hash files (MD5, SHA1 and BLAKE2), see here.
Once these hashes have been created for a particular file or folder (or disk), you have a snapshot that can be used, at any time in the future, to verify that not one bit of data has changed. And I do mean a "bit"; even the slightest change in the data will, thanks to the avalanche effect, produce a wildly different hash, which is what makes these algorithms so good for data verification.


The basic checksum tasks..
Most people will simply install checksum, and then use the Explorer context (right-click) menu to create and verify checksums, rarely needing any of the "extra" functionality that lurks beneath checksum's simple exterior. After all, checksum is designed to save you time, as well as aid peace of mind. This is how I mostly use it, too..
Create checksums..
Right-click a file, the checksum option produces a hash file (aka. 'checksum file') with the same name as the file you clicked, except with a .hash extension (or .md5/.sha1, if you use those, instead). So a checksum of some-movie.avi would be created, named some-movie.hash (if you don't use the unified .hash extension, your file would instead be named some-movie.md5 or some-movie.sha1, depending on the algorithm used).
Right-click a folder, the Create checksums.. option will produce a hash file in that folder, containing checksums for all the files in the folder (and so on, inside any interior folders), named after the folder(s), again, with a .hash extension, e.g. somefolder.hash
Verify checksums..
Click (left-click) a hash file (or right-click and choose Verify this checksum file..), checksum immediately verifies all the hashes (.hash/.md5/.sha1) contained within.
Right-click a folder, the Verify checksums.. option instructs checksum to scan the directory and immediately verify any hash files contained within.
That's about it, and this simple usage is fine for most situation. But occasionally we need more..
checksum launch modifiers..
When you launch checksum, you can modify its default behaviour in two important ways.

The first modifier is the <SHIFT> key. Hold it down when checksum launches, and you pop-up the one-shot options dialog, which enables you to change lots of other things about what checksum does next. This works with both create and verify tasks, from explorer menus or drag-and-drop. Here's what the one-shot create dialog looks like..
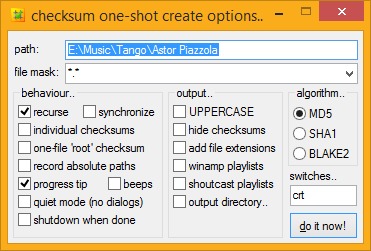
In there, as you can see, you can set all sorts of things. Hover over any control to get a Help ToolTip (you might need to repeat that to read the entire tip!). You can also drag files and folders directly onto that dialog, if you want to alter the path setting without typing. Same for the verify options.
The file mask: input is, by default, *.*, which means "All files", "*" being a wildcard, which matches any number of any characters. You can have multiple types, too, separated by commas. For example, if you wanted to hash only PNG files, you would use *.png; if you wanted to hash only text files beginning with "2008", you could use 2008*.txt, and so on.
If you click the drop-down button to the right of the input, you can access your pre-defined file groups, ready-for-use (you can easily add to/edit these in your checksum.ini)..

NOTE: Normally one drops folders into checksum's create options (path input). If you drop a file onto the create options, the path is inserted into the path: input, and the file name is added to the mask input - it is also inserted into the drop-down lost in case you need to get back to it.
If you drop multiple files into the create options, checksum will create a custom file mask from your selection. For example, if you dropped these three files; "hasher.jpg", ".txt" and "security.pdf", checksum would create the mask: "*.jpg,*.txt,*.pdf".
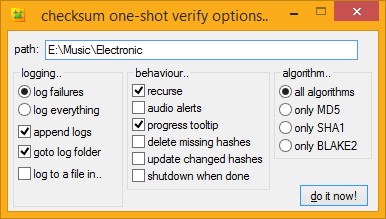
Here is what the one-shot verify options dialog looks like..

The second modifier is the <Ctrl> key. Hold it down when checksum launches and you force checksum into verify mode, that is to say, no matter what type of file it was, you instruct checksum to treat it as a hash file, and verify it. This works with drag-and-drop too, onto checksum itself, or a shortcut to checksum. checksum's default drag-and-drop action is to create hashes.
Amongst other things, this is useful for verifying folders in portable mode, simply Ctrl+drag-and-drop the folder directly onto checksum (or a shortcut to it), and all its hashes will be immediately verified.
batch processing..
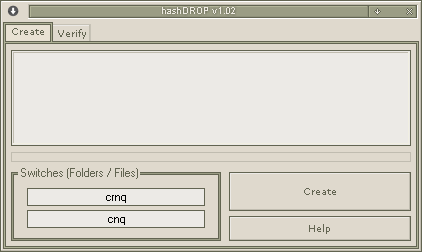
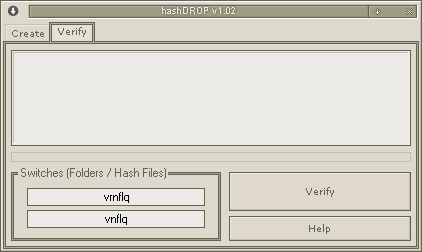
 hashDROP
A batch-processing front-end for checksum..
Because checksum can be controlled by command-line switches, it's possible to create all sorts of interesting front-ends for it. The first of these to come to my attention, is a neat wee application called "hashDROP", which enables you to run big batches of jobs through checksum, using a single set of customizable command-line switches.
As developer seVen explains on the hashDROP page..
Actually, that looks to be down right now. I've put a temporary copy of the page and download here.
On seVen's desktop, at least, it looks something like this..
hashDROP has already earned a place in my SendTo menu. Good work, seVen! For more information, documentation, and downloads, visit the (temporary) hashDROP page.
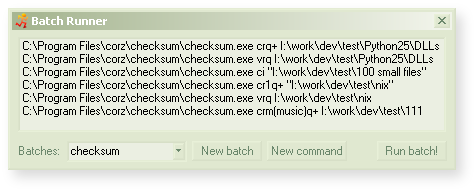
 Batch Runner
Run multiple programs in a batch..
I originally designed Batch Runner to run a big batch of tests on checksum before release, but it has since proven useful for other tasks, so I spruced it up a bit, made it available.
If you want to run loads of hashing jobs using the same switches, hashDROP is probably more useful to you. But if you want to run lots of checksum jobs with different switches, or as part of a larger batch of jobs involving other programs, then check out Batch Runner.
Batches can be saved, selected from a drop-down, run from the command-line, even from inside other batches, so it's handy for repetitive scheduled tasks, or application test suites, as well as general batch duties. At least on my desktop, it looks like this..
Automatic Music playlists..
Perhaps checksum's second most common extra usage is making music playlists. After you have ripped an album, you will most likely want a playlist along with your checksums, so why not do both at once? checksum can.
Right-click a folder and SHIFT-Select the checksum option (which pops up the one-shot options dialog), check either the Winamp playlists (.m3u/.m3u8) or shoutcast playlists (.pls) option, and then do it now! You're done.
By default, checksum will also recurse (dig) into other folders inside the root (top) folder. Now you've got music playlists that you can click to play the whole album in your media player.
Note that checksum will thoughtfully switch your file masks to your current music group when you select a playlists option, reckoning that you'll probably only want to actually hash the music files, not associated images, info files and such, but it's easy enough to switch it back to *.* (hash all files) if you need that. The rationale behind this being that it's what most people want, so the majority get the simpler, two-click task.
If you do this sort of thing a lot, check out the next section, for how to put this functionality directly into your Explorer context menu, and skip the dialog altogether..
Custom Explorer Context Menu Commands made easy..

On the subject of music files, you may encounter a lot of these, and fancy creating a custom explorer right-click command along the lines of "checksum all music files", or something like that. No problem; you can simply create a new command in the registry, add the "m" switch add your file masks, right?
But what if you change your file masks? Perhaps add a new music file type? Do you have to go and change your registry again? NO! checksum has it covered. Instead of specifying individual file masks, use your group name in the command, e.g. m(music) and checksum applies all the file masks from that group automatically, so your concept command is always up-to-date with your latest preferences.
Here's an example registry command that would do exactly that. Copy and paste into an empty plain text file, save as something.reg, and merge it into your registry. If you installed checksum in a different location, edit the path to checksum before you merge it into the registry (not forgetting to escape all path backslashes - in other words, double them)..
Windows Registry Editor Version 5.00

[HKEY_CLASSES_ROOT\Directory\shell\01b.checksum music]
@="Checksum &MUSIC files.."

[HKEY_CLASSES_ROOT\Directory\shell\01b.checksum music\command]
@="\"C:\\Program Files\\corz\\checksum\\checksum.exe\" crm(music) \"%1\""
NOTE! If you add a "3" to the switches [i.e. make them c3rm(music)] you'll get a media player album playlist files created automatically along with the checksum files. Groovy! Here's one I prepared earlier.
Setting new default Explorer context actions..
You can also change checksum's default Explorer commands, as well as add new commands, without going anywhere near the registry. Simply edit the installer's setup.ini file, [keys] section. For example, to always bring up the one-shot options dialog when creating checksums on folders and drives, you would add an "o" to those two commands..
HKCR\Directory\shell\01.|name|\command="|InstalledApp|" cor "%1"
Then run checksum's installer (setup.exe), and install/reinstall checksum with the new options. From then on, any time you select the "Create checksums.." Explorer context menu item, you will get the one-shot options dialog. If you would prefer to synchronize hashes under all circumstances, add a
HKCR\Drive\shell\01.|name|\command="|InstalledApp|" cor "%1"y, and so on.
Creating checksums "quietly"..
If you want to script or schedule your hashing tasks, you will probably want checksum to run without any dialogs, notifications and so forth. If so, add the Quiet switch.. q
When the q options is used alone, if checksum encounters existing hash files, it continues as if you had clicked "No to All", in the "checksum file exists!" dialog, so no existing files are altered in any way. This is the safest default.
If you would prefer checksum to act as if you had clicked "Yes to all", instead, use q+, and any existing checksums will be overwritten.
If you want synchronization, add a y switch (it can be anywhere in the switches, so long as it's in there somewhere, but qy is just fine)
Quiet operation also works for verification, failures are logged, as usual. Like most of checksum's command-line switches, these behaviours can be set permanently, in your checksum.ini.
Working with Cross-Platform hashes..
checksum has a number of features designed to make your cross-platform, inter-networking life a bit easier.
You don't have to do anything special to verify hash files created on Linux, UNIX, Solaris, Mac, or indeed any other major computing platform; checksum can handle these out-of-the-box.
If you need to create hash files for use on other platform, perhaps with some particular system file verification tool, checksum has a few preferences which might help..
You will perhaps appreciate checksum's plain text ini file (checksum.ini) containing all the permanent preferences. Inside there you can set not only which Line Feeds checksum uses in its files (Windows, UNIX, or Mac), but also enable UTF-8 files, single-file "root" hashing, generic hash file naming, UNIX file paths, and more. Lob checksum.ini into your favourite text editor and have a scroll.
checksum in your SendTo menu..
There are a number of ways to run checksum. One handy way, especially if you are running checksum in portable mode without Explorer menus, is to keep a shortcut to checksum in the SendTo menu.
Simply put; any regular file or folder sent to checksum will be immediately hashed. Send a checksum file (.hash, .md5, .sha1, plus whatever UNIX hash files you have set), and it will be immediately verified. If you want extra options, hold down the <SHIFT> key, as usual.
If you want to send a non-checksum file, but have checksum treat it as a checksum file, hold down the <Ctrl> key during launch, to force checksum into verify mode (either just after you activate the SendTo item, or perhaps easier; hold down <SHIFT> AND <Ctrl> together while you click, to bring up the one-shot verify options). This is also handy for verifying folder hashes.
How to accurately compare two folders or disks.
This is an easy one. First, create a "root" hash in the root of the first (source) folder/disk, then copy the .hash file over to the second (target) folder and click it.
That's it!
For situations where you don't need a permanent record of the hashes, you can fully automate the process of comparing two folders with simple checksum.
How to accurately compare two CDs, DVDs, etc.
(even when they don't have hash files on them)..
When hashing read-only media, obviously we cant store the hash files on the disk itself. However, thanks to checksum's range of intelligent read-only fall-back strategies, you can make light work of comparing read-only disks with super-accurate MD5 or SHA1 hashes, even if those disk were burned without hashes.
All we need to do, is ask checksum to create a "root" hash file of the original disk, using the "Absolute paths" option. This will produce a hash file containing hashes for the entire disk, with full, absolute paths, e.g..
531a3ce6b631bb0048508d872fb1d72f *D:\Sweet.rar

		558e40b6996e8a35db668011394cb390 *D:\Backups\Efficient.cab

		832e98561d3fe5464b45ce67d4007c11 *D:\Sales Reports\April.zip
There are a few ways to achieve this. For one-off jobs, you can simply add k1 to your usual command-line switches. For example, to create a recursive root hash file of a disk, with absolute paths, you would use crk1.
Another way, is to set (and forget) checksum's fallback_level preference to 2, inside checksum.ini..
fallback_level=2
With fallback_level=2, when checksum is asked to create hashes of a read-only volume, it will fall-back to creating a single "root" hash with absolute paths, inside your fall-back location (also configurable), which is exactly what we need!
Then in the future, to verify the original disk, or copies of the disk; you simply insert it, and click the hash file.
You can store the .hash file anywhere you like; so long as the disk is always at D:\, or whatever drive letter you used to create the .hash file originally, it will continue to function perfectly.
If you want to know more about checksum's read-only fall-back strategies, see here.
Or accurately compare a burned disk to its original .iso hashes..
If you have a .hash file of the original .iso file, in theory, a future rip of the disk to ISO format, should produce an .iso file with the exact same checksum as the original. My burner is getting old, but I needed to know, and so tested the theory.
I Torrented an .iso file of a DVD (Linux Distro) - the hashes were published onsite, checksum verified these were correct. I burned the disk to a blank DVD-R, and then deleted the original .iso file. Everything is now on the disk only. The .hash file is still on my desktop.
Then I used the ever-wonderful ImgBurn, to read the DVD to a temporary .iso file on my desktop.
Fortunately, the .iso file, and the original .iso file had the same name, so I didn't need to edit the .hash file in any way. Then the moment of truth. I click the .hash file, and checksum spins into action, verifying. A few seconds later... Beep-Beep! No Errors! It's a perfect match!
I can't speak for other software, but with ImgBurn at least, a burned disk can produce an .iso file with a hash bit-perfectly identical to that of the original .iso file used to create the disk, and can be relied upon for data verification. Good to know.
checksum as an installer watcher..
Because checksum can so accurately inform you of changes in files, it can function as an excellent ad-hoc installer watcher. All you do is create a root checksum for the area you would like to watch. Run the installer. And afterwards, verify the checksum. If anything has changed, checksum will let you know about it, with the option to log the list to funky XHTML or plain text.
checksum can be utilized in any situation where you need to know about changed files. You can even use it to compare registry files, one exported before, the other after. If the hashes match, there's no need to investigate further.
checksum as an upgrade helper..
I have more than once used checksum to help me with upgrades. Imagine the scenario.. Your local zwamp installation keeps bugging you to update. But you put it off because you modified a few files but don't remember exactly which files. No need! Let checksum take care of it..
Hash the installation folder, using a single-file "root" hash.
Copy the .hash file to the root (same folder) of a fresh copy of zwamp and click it.
Voila! A list of modified files. Now upgrading is easy.
checksum's custom command-line switches..
Click & Go! is the usual way to operate checksum; but checksum also contains a lot of special functionality, accessed by the use of "switches"; meaningful letter combinations which instruct checksum to alter its operation in some way.
If you have some unusual task to accomplish, the one-shot options dialog enables you to manipulate the most common switches with simple checkbox controls. You can see the current switches in a readout, updating dynamically as you check and uncheck each option. But this output is also an input, where you can manipulate the switches directly, if you wish. If that is the case, you will probably find the following reference useful.
You may also find this section useful if you are constructing a full checksum command-line for some reason, maybe a Batch Runner command or batch script, or custom front-end for checksum, or altering your explorer context menu, or creating a scheduled task, or uTorrent finished command*, or some Übertask for your Windows Run command (Win+R) or something else. In each case, switches are placed before the file/folder path, for example; the full command-line to verify a checksum file might look like this..
C:\Program Files\corz\checksum\checksum.exe v C:\path\to\file.hash
Here are all the currently available switches:
cCreate checksums.vVerify checksums.rRecurse (only for directories).ySynchronize (add any new file hashes to existing checksum files).iDuring creation: create individual hash files (one per file).
During verification: performs hash search for individual file (see examples, below).
sCreate SHA1 checksums (default is to create MD5 checksums).2Create BLAKE2 checksums (default is to create MD5 checksums).uUPPERECASE hashes (default is lowercase).mDuring Creation: File masks. Put these in brackets after the m. e.g..
m(*.avi,*.rm)
Note: You can use your file groups here, e.g.m(music)During verification: Check Only Modified Files.
Perform operations only on files with a modified timestamp more recent than their recorded timestamp. This is generally used along with the "w" switch, to update the hash and timestamp of a file or set of files you have mindfully changed, whilst skipping bit-checking all other files, potentially saving a lot of disk access and massive amounts of time, especially over network links.
Note: This feature is currently marked as "experimental".
jCustom hash name (think: "John"!). Put this in brackets after the j. e.g..j(my-hashes)dDuring Creation: Output Directory. Put this in brackets after the
d. e.g..d(C:\hashes)
NOTE: Make this the last bracketed switch on your command-line, i.e.m(..)j(..)d(..).During verification: Override Root Directory. *ßeta Only
Using the
dswitch, you can specify a new root directory for relative hash files, enabling them to be checked outside their original location.For example, if you created a relative
.hashfile for files in "D:\my files" and put the hashes in a folder, "e:\my hashes" using a command-line something like..
crd("e:\my hashes") "D:\my files"You can now verify this
.hashfile ("e:\my hashes\my files.hash") IN-PLACE using similar syntax:
vrd("D:\my files") "e:\my hashes"eAdd file extensions to checksum file name (for individual file hashes)..1Create one-file "root" checksums, like Linux CD's often have.
3Create .m3u/.m3u8 playlists for all music files encountered (only for folder hashing)..pCreate .pls playlists for all music files encountered (only for folder hashing)..qQuiet operation, no dialogs (for scripting checksum - see help for other options)..hHide checksum files (equivalent to 'attrib +h').
oOne-shot Options. Brings up a dialog where you can select extra options for a job.
(to pop up the options at run-time, hold down the <SHIFT> key at launch)bBeeps. Enable audio alerts (PC speaker beeps or WAV files).
tToolTip. Enable the progress ToolTip windoid.
nNo Pause. Normally checksum pauses on completion so you can see the status. This disables it.
(note: you can also set the length of the pause, in your prefs)kAbsolute Paths. Record the absolute path inside the (root) checksum file.
Use this only if you are ABSOLUTELY sure the drive letter isn't going to change in the future..fLog to a file
(if there are failures, checksum always gives you the option to log them to a file)gGo to errors.
If a log was created; e.g. there were errors; open the log folder on task completion.lLog everything.
(the default is to only log failures, if any).wUpdate changed hashes. (think: reWrite)
(during verification, hashes and timestamps for "CHANGED" files can be updated in your .hash file).USE WITH CAUTION ON VOLUMES YOU KNOW TO BE GOOD!
xDuring creation: used to specify ignored directories, using standard file masks.
e.g.checksum.exe cr1x(foo*,*bar,baz*qux) "D:\MyDir"During verification: delete missing hashes.
(hashes for "MISSING" files are removed from your .hash file).aOnly verify these checksum files.
(followed by algorithm letter:amfor MD5,asfor SHA1,a2for BLAKE2 - see example below).zShutdown when done.
Handy for long operations on desktop systems. A dialog will appear for 60 seconds, enabling you to abort the process, if required
The 'a', 'f', 'g', 'l' and 'w' switches take effect when verifying hashes.
The '1', '2', '3', 'e', 'h', 'j', 'k', 'm', 'p', 's', 'u', and 'y' switches take effect when creating hashes.
The 'd', 'i' and 'x' switches have different functions for creation and verification.
In other words..
global switches =b, n, o, q, r, t, z.
creation switches =1, 2, 3, c, d, e, h, i, j, k, m, p, s, u, x, y.
verify switches =a(m/s/2), d, f, g, i, l, v, w, x.
Switches can be combined, like this..
… checksum.exe v "C:\my long path\to\files.md5"… checksum.exe crim(movies) c:\downloads… checksum.exe vas c:\archives
… checksum.exe c3rm(music) p:\audio
… checksum.exe cr1m(*.zip) d:\
… checksum.exe vi d:\path\to\some\video file.avi
"d:\path\to\some\video file.avi" and verify that one file ]
… checksum.exe crkq1m(movies)j(video-hashes)d(@desktop) v:\
video-hashes.hash") for all movie files on drive V: and place it on the desktop ]
note: Although it won't appear in the options dialog, the custom name, "video-hashes", will still be set when you begin the job.
"C:\Program Files\corz\checksum\checksum.exe" cq "%D\%F"
notes:
The order of the switches isn't important, though the "
m" switch must always be immediately followed by the file masks (in brackets), e.g.m(*.avi)(same withd(dir),j(name)andx(file*mask)switches), and the "a" switch must be the first letter of a two letter combination, e.g.amThe
d()(output directory/root directoy) switch must be the last (bracketed) switch on your command-line. If you are using custom hash file name and/or custom file groups, put those first, e.g.."c:\path to\checksum.exe" cr1qnm(movies)j(my-hashes)d("c:\some (dir) here") "D:\My Movies"..which would quietly create a root hash file for all the movie files in
D:\My Movies, and put those hashes in "c:\some (dir) here\my-hashes.hash". Those tricky braces inside the example path are why it goes last.You don't need to specify the
m(music)group switch to create playlists, only the3. A command likechecksum.exe rc3 "P:\audio"would create checksums recursively for all files in the pathp:\audio, whilst creating playlists for only the music file types. Nifty, huh?Most of these switches also have a preference inside
checksum.ini. If that preference is enabled, you can disable it temporarily by prepending the switch with a-(minus) character, e.g. to disable the Progress ToolTip, use-tAny of these switches can be easily added permanently to your Explorer right-click (context) menus. For instance, you may like to always use the one-shot options, without having to hold the SHIFT key every time. So simply add an
o, and it will be so. See here for details of how to permanently alter checksum's Explorer context menu commands.
And remember, if there's some specific behaviour that you want set permanently, you can do that, and a lot more, inside checksum.ini..
checksum.ini
working with checksum's UNIX-style preference file..
checksum has a lot of available options. Here is a page that will help you get the most out of them.
I do requests!
If there's something you would like to accomplish with checksum, but don't think think checksum can; feel free to request a feature, below..
Request a feature!
If you think you have found a bug, click here. If you want to suggest a feature, leave a comment below. For anything else, click here.
I am trying to create the MD5 hash key from a string, ie. "20160720Lester" to use as a password key on a website.
I can generate the string but not the hash key in batch files, can I do this using this app ?
Not sure if this is the place for this...
I'm interested in using hashDROP with checksum, but Chrome flagged the download as malicious. When I check the link at VirusTotal, it returns a lot of hits:
https://www.virustotal.com/en/file/355a385d179b2fd69ffee8ace86fec3bd74884a60cf7be1a8faf433b4d3dfe99/analysis/
Is there some explanation for this other than the file being infected?
Hey, funny link! But also fascinating. I've seen this happen with some of my own (AutoIt-based) releases.. One or more brain-dead vendors flags the app for some generic-unknown-whatever-pattern-based-shite-they-saw-in-some-app-somewhere, and then this pops up in someone's scanner and they report it, and other brain-dead vendors blacklist it, and so on and so on and so on. 50% is an impressive ratio for this kind of Chinese misinformation whispers!
At any rate, I know the author of HashDrop (seVen was one of checksum's original beta testers) and I know for a fact his downloads are completely malware-free.
If in doubt, run it in a sandboxie inside a virtual machine.
;o)
Is there any way to ignore directories on verify? I want to not verify the $RECYCLE.BIN directory. The x($*) option works on create, but not on verify.
Hi Cor,
Can you add SHA256, SHA384 & SHA512 to your program? I have a need to check files that are in SHA512. It would be great to be able to use your program for any and all checksums!
Thanks!
Support for FreeBSD, PCBSD, Mac, Ubuntu Linux, other Linux/BSD, would all be nice. I saw you did a little bit with a Bash script - maybe something like Lua or Python would be better for that. I quit creating shell scripts (bash, sh, zsh, csh, tcsh) because the code is completely useless in terms of platform independence. I'm now choosing pretty anything else, and I've found it much easier to use multiple popular programming languages instead of trying to port obscure shell scripts.
Has anything changed recently with hashDROP? Both Chrome and my antivirus (Avast) are blocking it.
Two months ago in July, VirusTotal reported only one detection for the site (http://imgur.com/9K1Tqro), but now there are three positive results.
Edit: Nevermind, my apologies, just saw Steve's post from two months back.
It would be nice to have an option to report on files that do not have hashes when verifying. Maybe even add the checksums right then if w switch is used, like it updates changed files now.
It would be fantastic to be able to run it from a script and have the script wait while it runs, instead of it running separately and the command returning immediately. Maybe even return an exit code to %ERRORLEVEL% if there are any errors. That would make writing scripts to automatically verify files and email me if there are errors much easier to write. Or maybe just an option to send an email if changes are detected?
An @token for the disk volume name would be handy when check-summing removable volumes.
Is there a way to create a simple log entry when the check-summing is all OK? Basically indicating in the logs that this disk (folder, ...) was verified on this date as OK.
You can also tell checksum to log everything, though this will potentially create a large log, which probably isn't what you want.
You can also check the exit status, which is everything went fine, will be 0. See here for more details.
;o)
"Essentially, no news is good news. No log means everything was 100%. "
Hmmm... The queue mechanism makes it handy to line up a number of different folders/volumes to Verify. Enough so that if I don't write them down separately I sometimes can't keep track of what all I queued up. Making a list on paper because a computer program can't seems odd.
FYI: I tried log everything, but then log files are created that are too big to load in a modern browser (probably any browser). I guess I could shift to text logs.
Perhaps I will revisit scripting the Verify list and have the script generate a separate pass/fail log.
An @token for the disk volume name would be handy when check-summing removable volumes, your thoughts?
After i have made the checksums for a whole hard drive.
I need a way to verify those checksums once a week.
How can i automate this?
startup_command=schedule
inside checksum.ini and launch checksum (by clicking it directly, with no jobs). This will launch the schedule wizard where you can create a checksum scheduled task.
;o)