This wee tutorial isn't about how to burn disks, we all know that! No, this is about how to burn hot disks. The kind of disks you'll be proud to share. The kind of disks that get people saying..
"You are the DiskMaster!"
Here was my first attempt, a backup disk..
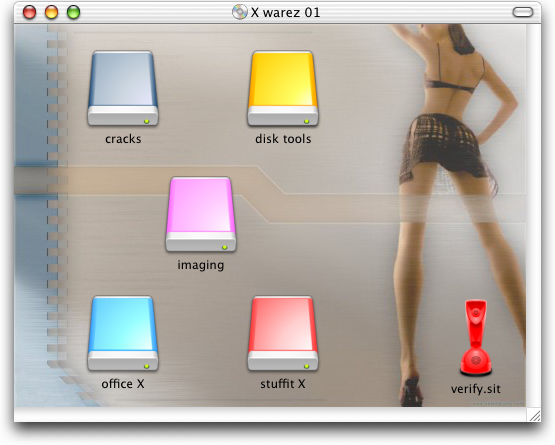
with sub folders, of course..
this time with breasts..

I prefer this to a plain background.
And here's another cool thing about these hot disks..
Notice the first one has a file called "verify.sit" at the root level.. well if you select ALL (all the contents of the drive) and use the stuffit concept command on that baby, you can check all your archives at once that's right, verify the whole disk! in a one-er! <applause>
the technique, step by step..
- Prepare the disk.
- Build your disk on a temporary partition
The temporary Partition is just a mounted disk image, NOT an actual partition on your hard drive. You create it with Disk Copy, or Toast (see the "Utilities" menu), or whatever. It's just a standard disk image, any decent disk imaging software will do the job. If the target is a CD, make it 690MB or whatever your CD holds minus a few MB for manufacturing errors ;o) - Give the volume a name.
This is important. The Finder uses this name to
find the image later on.
- Make a nice background pic. The ones here are just
desktop pictures
grabbed off the web (I was specifically looking for pics I could shrink to fit my disks).
Whatever you like..
- Save the picture.
- You must save the picture on your new
volume, maybe in the root directory. If the images aren't on the disk,
they wont travel with the disk..
- Drop the image right into the top folder and call it whatever you
like, but do make it a jpeg or a png. I usually use jpegs, because
they are the smallest format for photos. My originals look much better than
the highly compressed pics you see here (even with
high quality levels, jpeg compression's file size savings will be enormous)
- Pretty up your folders.
- Open the folder you want to customise and hit apple-j
(or "Command-J" if you prefer). In the "View Options" dialog, click on the
picture button at the bottom and locate your tasty new background pic.
I'm hoping that in the future we will be able to set a whole drive's backgrounds in one go, and have a global "X drive" background, another background for User Disk, etc, but for now you'll have to do them all by hand. It doesn't take too long, especially put the PATH of the image location in the clipboard and just keep pasting it into the "Select a picture" dialog box - something like -/Volumes/mydisk/tasty.jpg
- Hide the pics!
- There are lots of ways to do this, and a plethora of new
"extended info managers" have recently sprung up for OS X. I recommend
Setfile in the
terminal. Quick and easy.
- I guess you could put a "." at the start of the name, but
that would be painful in practice. Of course, you don't have to make the pics
invisible, but it would look stupid if you just left them lying around, wouldn't
it? and the real question is.. Are you a Disk Master?
There's loads of tools out there that will happily do the job, for something with a GUI, try Xray. A useful tool. The excellent Filebuddy also springs to mind.
That's it, now you've got disks to die for!
;o)
cor
the "Rip, mix, burn" pic is from Dangergirl, & © 2002 J. Scott Campbell. you can see the original here. I've no idea who made it into a desktop, but they did a great job. Still don't know who did the first pic.
appendix a: custom icons (son of hot disks..)
No hot disk would be complete without a beautiful custom icon. A picture can speak a thousand words, especially at that point it mounts on the desktop. Anyway, I've had enough questions about this to warrant an add-on, so here it is..Lots of folks paste transparent images in the Finder and are disappointed when the transparency is lost. Worry not! Creating beautiful semi-transparent custom icons on OS X disks is easy, so long as you have the right tools.
Get IconographerX which understands the complexities of the OS X icon, and more importantly, knows how to export icon families.
I get my results like this..
- create an icon with IconographerX - make it a HUGE icon with a black
1bit mask and a nice grey-shaded 8bit mask. The darkest areas will be opaque,
the light areas more transparent. - btw, "huge" as an official apple icon size!
- save the icon as a Mac Universal resource. (allow Iconographerx to regenerate
the masks if they're out of sync) Quit IconographerX whispering "thanks again bud"
under your breath.
- consider paying the shareware fee.
- get info for your new icon in the Finder and copy.
- get info for the disk image in the Finder and paste.
(first delete any previous wonky icons)
- store your icon file away somewhere. After all, this is your creative work!
Voila!
Rake about inside the Iconographerx package and open a file called "iconbasics.html" which explains about masks and stuff, this is info you need. Probably you could get it from the built-in help.
Welcome to the comments facility!
how can I get my disks to open up when they mount like other disks do?
.H
ensure you are saving images read-only, or compressed
;o)
Oh no! I went setfile crazy and made all of my files on my hard drive invisible. How do I make them visible again?
PS. Thanks! Everything worked like a charm. Set the cd image to read-only like you suggested and now it opens up like a normal cd!
heheh, well Disk Master Juan A. Bee, there are a number of ways to do this.
the easiest (for me) would be to use setfile again. something like..(note the lower-case "v" ) you can use wildcards, too, so..
would make every invisible file on your hard drive visible again! (btw, sudo is SuperUser DO, you'll need to input your admin password for that one)
Although the OS X "get info" lacks any controls for visibility, our old friends FileBuddy, and Xray will do the job nicely, though not your whole hard drive! Of course, first you've got to locate the invisible files, and if you're not in the terminal, that can be tricky.
The easiest way around this is to show hidden files in the Finder. Something like TinkerTool (a preference pane) will help you achieve this.
Terminal is best, though.
make more fun!
;o)
(or
It was shit i hated it no point off dis website atol, got it so if i wos u i would shut it down before they shut you down got it.
i dont know ho u r but ill get u one day got it got it got it got it got it got it
quick dude! more medication!
;o)
(or
thanks man great tute really helped me out
thanks again
hey thx this was just the tutorial i was looking for, i need a portfolio in pdf but i tought it would look great to have a nice background on the cd, only i couldn't do it in toast!
now i m gonna try to hide mi picture background
thx
and keep on posting stuff like this !!!!
Greetings from New Zealand!
to begin, many thanx for the Hot disk tutorial, l had been searching for this type of information for a while.
I am hoping that you may be able to explain an aspect of the process in shall we say "idiots" terms as l am no quite getting it right and I am not sure what lm doing wrong?
in step 2: Save the picture. - l am not succeeding in saving the picture on your new volume. You explain clearly but l am not sure how to do it. I find a pic and stick it on my desktop. Then l select it using the view options, it appears in the new partition, looks great, l put in the files/Folders, l want, jazz them up as per instructions, give a nice custom icon, Open Toast, select data tab add the new partition, click burn and all goes fine.
However when l mount the new masterpiece the various fles/Folders are there and look fine, but the custom background is not there, just the sad white default.
l know somehow I am failing to save the custom pic with new volume, but cannot work out how to do it.
If you had the time to show me the error of my ways that would be greatly appreciated!
If l am simply being a bother, my apologies!
kind regards,
David
No bother!
You say I find a pic and stick it on my desktop. Then l select it using the view options, this is the trouble, this is where you miss out an essential step. it should read like this..
I find a pic and stick it on my desktop. Then I move the pic to my newly created volume. Then l select it using the view options
It looks like the problem stems from you not having an actual new volume to put it on. You need to create this new disk before you begin this process. Don't burn it, just create it (a virtual image), and have it mounted on your desktop, and then you can start to throw stuff into if, files, background images, whatever.
If this still doesn't make sense, get straight back here; there's noi such thing as a stupid question.
;o)
(or
Greetings from New Zealand again!
thank you for the warm reply!, must admit that despite the web being such a treasure trove of information, Being "newbish' can in some places be sacrilige to the 'pros'. After being flamed once or twice ya get careful.
Any way, ... your directions certainly solved my problem! (damn logical, in hindsight). Now, my next challenge relates to your
Step 4. Hide the pics! indeed the pic is sitting there detracting from the "Hot Disk, look" so l assume that I need to make it invisible. Youve given excellent links to software to do the task so l shall give it a whirl.
So... thanks again, lm finding this whole thing damn exciting because it feels like lm learning some of the nitty gritty techniques that lm sure there are many of but which you you dont find in the "manuals"
U da man!
Cheers,
David
Rest assured David, for every command that's in "the manual" there's another six that aren't.
That excitement you feel is "the thrill of hacking", and of course hackers built the internet as we know it, and a lot more besides. In us us all, some more than others.
Have fun!
;o)
(or
ps.. aside from using setfile naming a file beginning with a "." will make it invisible on most operating systems.
Whats the name of that chick??????????
Man! I wish I knew!
A phone number would be handy, too!
;o)
(or
Where did you get the clip art for the girls? I'd like to make an avatar from it.
Thanks amigo,
Migs
hmm.. the crawlspace link (under the artcile) seems broken right now. hopefully not for good. that's the dangergirl pic, you can google for loads more links to that. The second one can be downloaded from desktopgirls.com, I'm not sure who originated the image.
The pics I used are available in the archive.. https://corz.org/public/images/
have fun!
;o)
(or
please send me (sexy cartoon's photo)
see previous post!
;o)
aaaaaaaaaaaaaaaaaaahhhhhhhhhhhhsex
undefined
I found this page so many months ago.
And now, after dozens of funny made HOT disks, I can scream: Thanks a lot!!!
hallo ik ben richard
how do you see more of these pic of the cartoons
scroll up about 6 inches, and follow the link I give there
;o)
Very nice, but does anyone know how to make a disk (firewire or usb) auto-open a finder window and set the default settings so they will open to the view you want. Limewire's download and others do it, but I can't figure out how to get a FW or Jump Drive to do it.
E-mail me if you have an answer, please.
Hello, it's possibile to make this procedure readable for a crossplatform cd, in particulary with xp?
Thank U.
Erm.. Yes and no.
XP won't recognize any of this stuff, but depending on how you burn your cross-platform disk, you could achieve a similar effect for the XP version.
The biggest hurdle is that windows uses drive letters, as opposed to volume names, for its paths, so any image you place on the background would need to be referenced by its drive letter, i.e. "D:\something". The trouble is that there's no guarantee that when the disk will be at "D:\", mine is "K:\".
Most are at D:\, though and you could probably do a reasonable mock-up with windows' built-in background image facility. This is achieved by editing a "desktop.ini" file, and it might look something like this..
[extshellfolderviews]
{BE098140-A513-11D0-A3A4-00C04FD706EC}={BE098140-A513-11D0-A3A4-00C04FD706EC}

[{be098140-a513-11d0-a3a4-00c04fd706ec}]
Attributes=1
IconArea_Image=D:\img\fook.bmp
IconArea_Text=0x0080FFFF

[.shellclassinfo]
IconFile=D:\icons\fook.ico
ConfirmFileOp=0
InfoTip=hovering over me gets you this text.
There may be other ways to do this, but I've not come across them, even looked for them.have fun!
;o)
ps.. if I remember correctly, for this to work as expected, the "system" attribute must also be set on the folder (attrib +s). If you are trying to do all this from a Mac, good luck!
Posting here is disabled at this time.