two-drive iMac!
saving you the many many hours of iMac upgrading is!

all you need is courage, and maybe a ziff-splitter.. Hi, fellow super-cool iMac users!
Like you, I love my iMac! and I love OS X. (I'm using the word "love" as a technical term here) and having the two together has got to be the coolest thing on the planet computing, but there is one small problem.
Installing OS X with any real degree of efficiency means partitioning. And partitioning means wiping your hard drive clean. Or in other words, a lot of backing up. No problem, just copy everything wholesale onto another drive. Copy it back when you're done. Easy. Trouble is, an iMac only has one hard drive.
More recent iMacs come with firewire (but only one internal IDE socket, more on that later), so an external firewire drive, maybe an iPod, would make this job a synch. But what if you can't afford an iPod? Or, like my mac, don't have firewire? Does that mean that older iMac's should be denied their true destiny, the chance to at last run a real operating system? NO! This is one upgrade you don't want to miss out on.
Until now, classic iMac users (the ones without iPods and fancy firewire drives) would have to back-up the whole lot by hand, burning CDs or archiving the most precious bits over the LAN, if indeed they have these facilities. Not for us the easy-peezy quick mirror, the perfect "start-where-you-left-off" restore.. But things have changed, and here's the skinny, and you really did hear it here first..
You can run two hard drives on an iMac!!
You'll need..
- A big empty hard drive: this is obvious.
It's a smart move to to upgrade your hard drive right now while you're upgrading to
OS X. You can make nice clean partitions and then install OS X on it. Once you're
done, perform this Two-Drive magic to get your OS9 data back onboard.
Alternatively, you could use a temporary slave drive, any old peecee shite will do fine, so long as it's big enough to house all of your OS9 system and applications. After you partition your drive, you move the data back. But THIS is the time to upgrade your hard drive! Hard drives are cheap! Do it NOW! - Twin IDE cable: that is an IDE cable
with 3 plugs on it, 1 for the mac, 2 for the drives, master and slave. If you have
a slot-loading mac, make it a long one!
- Seperate power supply: any old WORKING
12v peecee unit will do fine. maybe the iMac could supply enough power for you to get
by with just a ziff-splitter*.. maybe not.
I didn't fancy trying, i have only one iMac!
- nerves of steel. I mean it.
You're going to have to switch the drive power on and off manually.
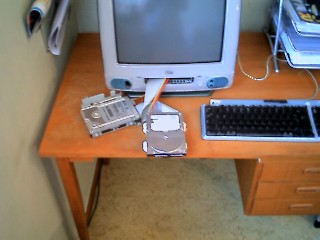
This is what it might look like..
[note how my wallpaper by strange "coincedence" matches my iMac!]
things to note..
- This is a temporary thing. Install your new hard drive, partition and install OS X, connect the old drive, copy the data over. the end.
- or - if you plan to partition your current drive - attach the slave, format it, copy the data over, partition and install OS X, copy data back from slave. the end.
- the IDE specification states that you can have up to two devices per cable/socket. So long as you can supply power (the built-in power supply should handle two drives okay, no more) and have an enclosure for them, there's nothing to stop you putting FOUR hard drives on your iMac, or rather, near your iMac. This only works for older iMacs. Newer models (slot-loaders and later) apparently only have one internal IDE socket.
- You can only run one Internal Hard drive on an iMac. Period! There just isn't space in the mac to mount the drive permenantly, unless you took yer CD player out maybe, hmm..
- Owners of newer iMacs will not be able to feed an IDE cable out of the front. You might have to run your iMac in a slightly unassembled state while you copy everything over. I recommend slot-loaders got a *really* long IDE cable!
okay, let's do it..
First, and most importantly: Turn the power OFF!!Now pull you iMac to bits. Ho seriously! Remove the single rear screw as shown in your instruction manual, and also beautifully described here.
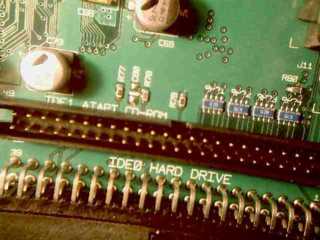
Remove the two wee screws and undo the plugs and stuff as shown above, now slide your iMac's belly out. next, locate your hard drive. it's fiddly, but you should be able to unplug the IDE cable that's between it and the mobo (motherboard).
Mine was nicely labeled..
Replace the IDE cable with your new three-plug version and feed the spare end out through the CD drawer hole (if you've got a tray-loading mac) or out through the *somewhere else* if you've got a slot-loading mac. maybe you guys will need a "Really Long Cable".
Put the whole lot back together and attach the second drive to the cable (remember to set the jumpers on that drive so that it's the "slave" drive), bung in the power plugs and take a long, deep breath..
switch on your mac.
When you hear your mac's hard drive power up (maybe a half-second later), switch on the second drive's power supply. Just listen to yer mac for cues, when your internal kicks in-switch on the power. if it screams, let go!
If all goes to plan, the second drive will mount without any fuss. Once you've formatted it to HFS+ (unless you have some compelling reason to use a different format) with apple's disk utility, you can copy all your mac files over. Don't forget any invisible ones!! (it might be a nice idea to create a huge disk image on the other drive instead, but I haven't tried this)
There are quite a few apps out there that will do this in OS X, and the ditto command is excellent in the OS X terminal, So if you opt to install the new drive first, get the data later, you shouldn't have any problems, but in OS9 copying all the invisible files and desktop databases and stuff is a pain. In practice, you just need to copy over your applications, work and system folders. Also making a copy of your desktop folder would be a good idea.
It's probably wise to power down and disconnect your second drive while you install OS X. later on, you can connect the slave and put all your old stuff back. Just leave the cable hanging out of the front while you're installing!
when X is in, your OS 9 system can have a partition all to itself and if you give your applications partition the same name your old drive had, you can start right where you left off!!
have fun, and don't forget to earth yourself, before and after!
* A "Ziff" is the name for the 4-pin power plug found inside computers. A Ziff-splitter allows you to put two devices into one power socket, kind of like the 2-into-1 mains adapters people used to use before the funky 4-way power-strips became so cheap.
UPDATE The Ziff-Splitter method has been tested by a the brave kitesurfSweden, and he found it to WORK PERFECTLY. So you don't even need an external power pack! just a little ole Ziff splitter. And here it is..
Wow! A sight to behold! A true 2-Drive iMac. thanks kite!
to sum up
In short, here's what we will probably do:- open the mac
- swap over the drive
- install OS X
- copy data onto new drive
- disconnect old drive
- reassemble mac
conlusion..
At the end of the day it was quicker for me to open up my iMac, swap around a few plugs, power up a slave and do some big copying. It saved me a LOT of backing up all my work, applications, special folders, preferences, etc etc. It would haven taken hours and hours. I considered going the LAN route, but there were a number of factors to overcome there too. We forget how tricky cross-platform networking used to be. In short, this operation isn't going to be for everyone.If you're the kind of person who would replace their own ram chips then this wee project won't be difficult for you. If you've never been inside a computer, and you're strapped for cash but desperately want to get your iMac into the 21st Century, this might be a great time to start getting your hands dirty.
Have fun! ;o)
Welcome to the comments facility!
this'll do!
(or
pretty neat!
how long is a "really long cable"?
nice..
keep them tutorials coming C
Q
can't stop 'em Q baby!
check blog for recent updates!
;o)
ps. about 2 feet.
Posting here is disabled at this time.